AV receiver (AVR) serves as the central hub for home theater systems, providing a seamless integration of various audio and video sources. This versatile device offers plenty of connectivity options, allowing users to connect a wide range of equipment, both modern and outdated. In this article, I will explore the receiver connections, making it easier for you to set up and optimize your home theater system. We will discuss the various ports and connectors that facilitate the integration of your devices, ensuring a comprehensive understanding of the subject. To provide a practical illustration and make a possible AV receiver setup explained, I will use the connection options available on the Denon AVR-X6700H model as an example.
Audio connections
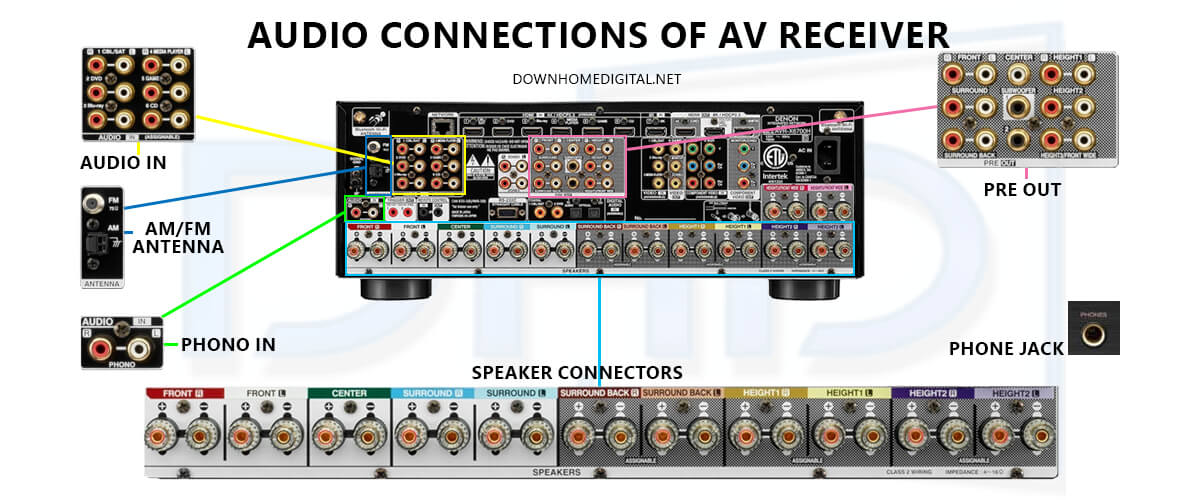
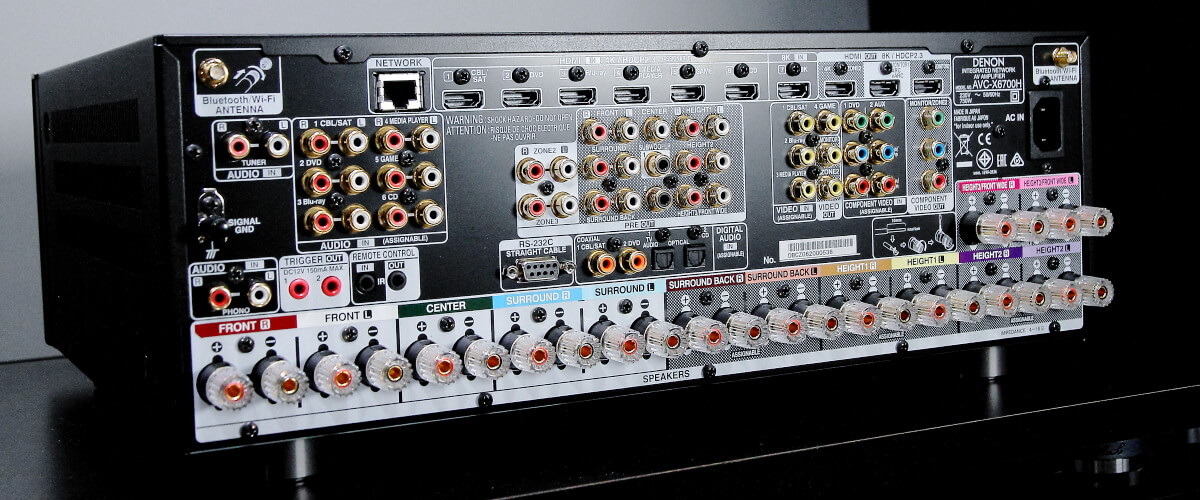
AV receivers aim to provide a captivating and immersive audio experience by presenting a wide range of audio connections. In this section, I will explore the unique functions and characteristics of each port type, examining how they accommodate various audio formats, devices, and individual preferences.
Speaker connectors
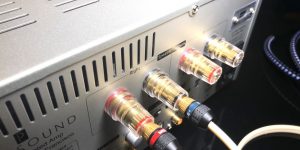
Speaker connectors link the receiver to speakers for sound output. Each speaker requires a separate cable, typically purchased independently, connected to its corresponding section on the receiver (e.g., front left to the front left). To connect, strip the cable ends, revealing the bare wire, and carefully attach the positive (red) and negative (black) wires to their respective terminals. Next, unscrew the connectors, insert the wire, and screw them back down. Despite the slightly delicate wire insertion process, these connections are generally simple, well-labeled, and straightforward.
Digital Audio In
When using your TV’s smart features to access content like Netflix or sports events, you’ll need to send audio from the TV to the receiver. Modern HDMI systems often rely on the ARC (Audio Return Channel) feature for this task. If your TV lacks ARC compatibility, consider using an optical cable for audio transmission between the TV and the receiver. Coaxial cables are another option for connecting devices. The Digital Audio In section can also be used for connecting set-top or satellite boxes, older TVs without HDMI connectors, or DVD/Blu-ray players. However, HDMI/ARC is typically the preferred method in most setups.
Audio In
For devices without HDMI, audio connections can be made using standard RCA cables, which have two channels (+ and -). Ensure the red (+) and black (-) plugs are connected to their respective ports. The process is typically straightforward, but turntables require special attention. They must be connected to the Phono inputs using a phono cable, as these inputs are specifically designed to handle the unique amplification needs of turntables.
Pre Out
Pre Out connections allow the AV receiver to function as a preamplifier, passing audio signals to external power amplifiers or active speakers. Certain equipment, like subwoofers, have built-in amplifiers and don’t require external power. To connect them to your receiver, use the appropriate output section. The subwoofer, which typically includes a designated cable, connects directly to the ‘Subwoofer’ port. Additional connections may be present for connecting extra speakers with a separate amplifier to enhance power or sound characteristics. These connections cater to more advanced setups and may not be necessary for most users. Generally, a subwoofer connection suffices for a satisfactory experience.
Phono In
Phono In ports are designed for turntables with moving magnet (MM) cartridges. For instance, the AVR-X6700H features an integrated phono preamp that amplifies and equalizes turntable signals. When connecting a turntable with a low-output moving coil (MC) cartridge, use a commercially available MC head amp or step-up transformer. The unit’s earth terminal (SIGNAL GND) helps reduce noise but isn’t for safety grounding. Also, connecting the ground line may increase noise depending on the turntable. In this case, leave it unconnected.
AM/FM Antenna
These terminals connect to AM and FM antennas, enabling radio reception. Our example model includes antennas for both types of signals. If you want to enjoy listening to the radio through your surround sound receiver, this is where you connect the antenna. Usually, one is provided with your system. Retract the tower, insert the wire, release it, and start enjoying your favorite radio stations.
Phone jack
A headphone jack on the front panel allows for private listening using headphones. The AVR-X6700H supports various headphone impedance levels, optimizing the audio output accordingly.
Video connections
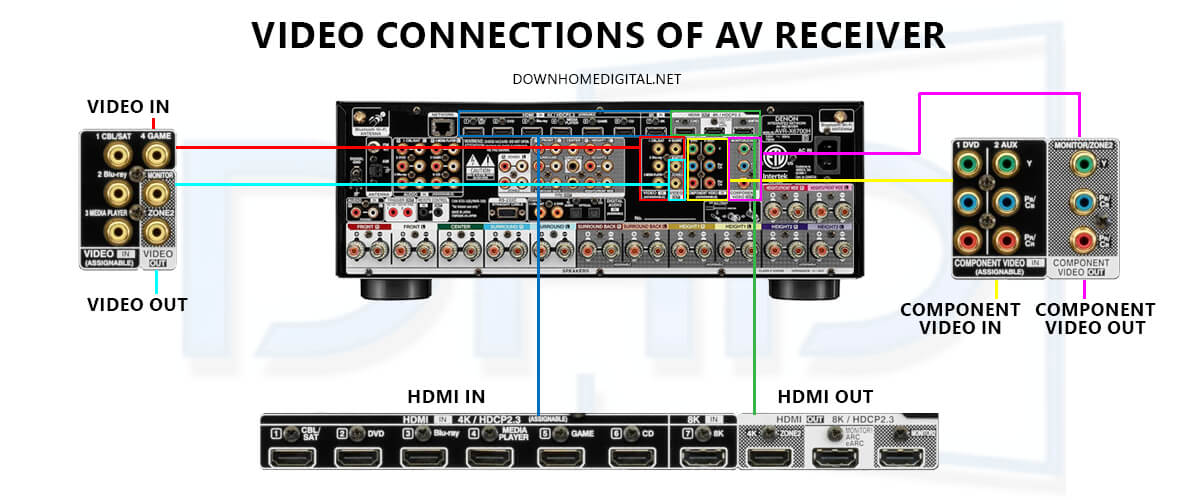
Modern AV receivers feature multiple video connections for providing an optimal level of operation with a variety of video content. Let’s discuss the characteristics and purpose of each type of port.
HDMI In
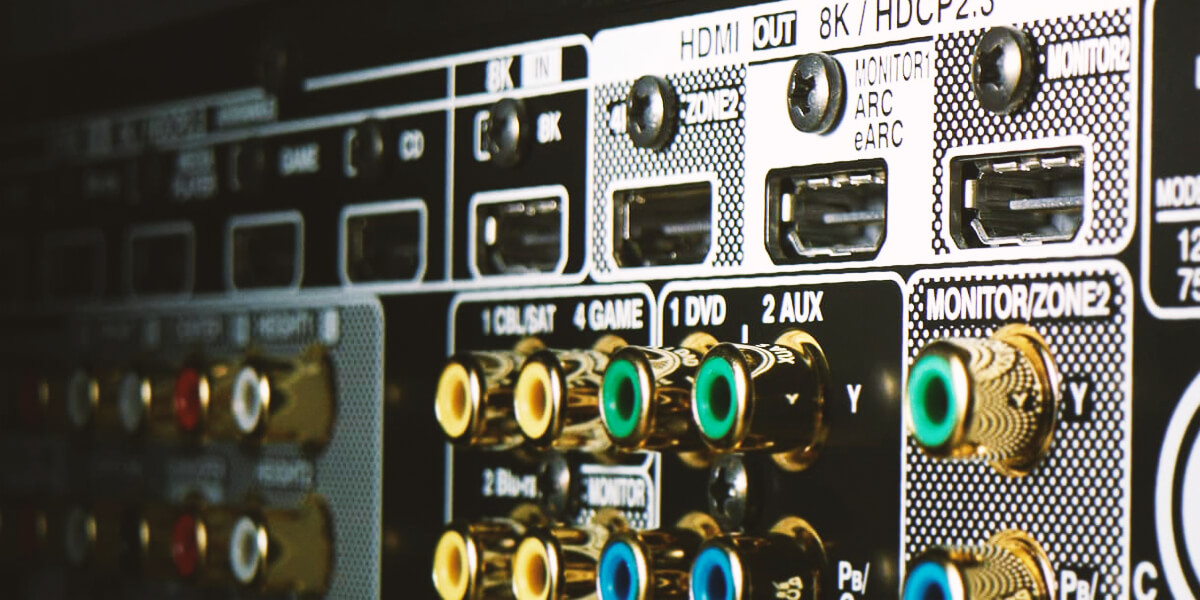
HDMI In ports accept high-definition audio and video signals from external devices. The AVR-X6700H includes eight HDMI inputs, supporting HDCP 2.3, 4K/120Hz, and 8K/60Hz video, as well as eARC (Enhanced Audio Return Channel). Most modern consoles, Blu-ray players, DVD players, and TVs utilize HDMI (High-Definition Multimedia Interface) for connections. HDMI cables have a unique, flat connector that is easily recognizable. To connect devices like consoles and DVD players, run an HDMI cable from their output to the inputs on the receiver. Don’t worry about the specific labels on each port; HDMI inputs are interchangeable. For example, you can connect your Xbox to a port labeled CD without any issues, as all HDMI inputs function similarly.
HDMI Out
HDMI Out ports transmit audio and video signals from the receiver to a display, such as a TV or a projector. The AVR-X6700H has three HDMI outputs, allowing for multiple display configurations or a separate zone. In essence, this is the connection point for transmitting video signals from the receiver to your TV. Just connect the HDMI Out from the receiver to an HDMI port on your TV. If there’s content playing on your console or Blu-ray player and you’ve selected the correct HDMI port using your TV remote, you’ll see the picture on your screen.
Video In
Composite Video In (RCA) ports provide analog video connections from older devices. The AVR-X6700H includes two composite video inputs for compatibility with legacy equipment. There are still DVD and Blu-ray players that don’t utilize HDMI. In such instances, they rely on video cables for connecting to the receiver, which you would plug in here. These devices typically come with the necessary video cable, and connecting it allows you to see the picture. Keep in mind that you’ll need to connect the audio separately using one of the Audio In ports, either digital or analog.
Video Out
The Composite Video Out port sends analog video signals from the receiver to a display. This is applicable when your TV does not have HDMI. As with the previous section, simply connect a video cable from the Monitor Out to your TV. However, a separate cable is required for audio transmission.
Component Video In
Component Video In ports provides higher-quality analog video connections than composite video. Home theater manufacturers must consider different scenarios and diverse customer preferences, even if it means including outdated technologies like component video ports. Although the component video is relatively antiquated compared to current home entertainment standards, it’s easy to connect by matching the colors. However, using HDMI is preferable due to its superior performance. It’s important to note that component video only transmits video signals, so audio connections must be established separately. Make sure to connect the Out ports of your player to the In ports of your receiver.
Component Video Out
The Component Video Out port transmits component video signals to a display. These connectors function identically to the input ones. This is the spot for connecting your TV when utilizing a component video cable.
Network connections
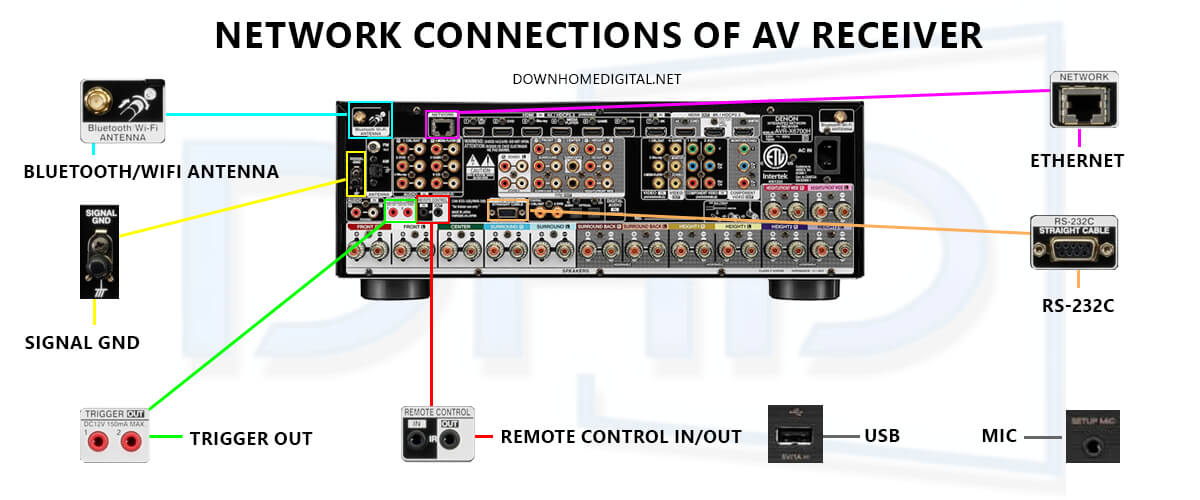
AV receivers present an array of network connections for improved functionality. I will examine the specific characteristics and uses of each type of port.
Bluetooth/WiFi antenna
Bluetooth and WiFi antennas enable wireless connectivity for streaming audio and video content, as well as facilitating remote control and firmware updates. The Denon AVR-X6700H comes with built-in Bluetooth and WiFi capabilities, supporting dual antennas for better signal reception and stability. Typically, all that is required is to tighten them into place, and they will function automatically. However, you must choose the desired network through the on-screen menu.
Network
The Network (Ethernet) port allows the AV receiver to connect to a wired home network, offering a more stable connection for streaming content and accessing online services. The AVR-X6700H’s Ethernet port supports gigabit speeds for optimal network performance.
USB
USB ports on AV receivers serve multiple purposes, including playing media files from USB storage devices, connecting and charging mobile devices, and facilitating firmware updates. That is how you typically use the USB port on the AVR-X6700H. First, locate the “USB” port on the receiver’s front panel. Choose the device to connect, such as a flash drive, external hard disk drive, or smartphone. For flash drives and external HDDs, format them with a compatible file system, FAT16, FAT32, or NTFS, and load supported media files. Next, enable suitable USB connection settings for smartphones, such as USB Mass Storage or Media Transfer Protocol. Use a compatible USB cable to connect your device to the receiver’s USB port. The on-screen menu is used to view and access the contents of a connected device. Adjust volume and other settings as required while playing desired audio or video files.
Trigger Out
Trigger Out ports send control signals to external devices, such as power amplifiers, screens, or projectors, to synchronize their power states with the receiver. These ports activate when specific events occur, such as changing inputs or turning on the AVR. The trigger-out ports automate home theater systems by controlling devices, making the experience more convenient. For instance, a power amplifier can be turned on when the AVR is turned on, or a motorized screen lowered when the projector is turned on. Additionally, our example model has a trigger in the port that triggers the receiver to turn on when a compatible device is turned on, which is useful for devices without HDMI-CEC functions. This simplifies control of all devices with a single remote.
Remote control In/Out
Remote control In/Out ports enable the receiver to be controlled by external systems or to control other devices through infrared (IR) signals. The AVR-X6700H features both IR input and output for flexible integration with home automation systems. Imagine you need to hide your receiver in a place that’s not easily accessible, like a cupboard. In this case, you might not be able to control it with your remote. The In port solves this problem by allowing you to connect an external receiver that can communicate with your remote. Out port is useful when you want to control the receiver through another device, like a CD player. This is a specific circumstance that not everyone will encounter, but it’s still a handy feature to have.
RS-232C
RS-232C is a serial communication port used for integrating the AV receiver with advanced control systems, such as custom home automation or professional installations. The AVR-X6700H includes an RS-232C port for this purpose. You won’t use this port unless you’re into custom home theater setups. Unlike other ports that carry audio or video, it’s a multi-pin, locking cable that connects PCs or external touchpads for on-screen control. This port allows you to automate your system to turn on or off at a set time. While most people won’t need this feature, it’s good to know about it nonetheless.
Signal GND
The Signal GND (ground) terminal provides a common ground point for devices connected to the receiver, helping to minimize signal interference and improve audio quality. The AVR-X6700H offers a Signal GND terminal for this purpose. This feature is mostly for turntables. To prevent an unpleasant humming sound, a turntable without its own preamp needs to be electrically grounded. To do this, connect the grounding wire. It’s a straightforward process, and you can forget about it once it’s done.
Setup mic
The Setup mic port is specifically for the calibration microphone included with the receiver. This microphone measures and adjusts speaker settings to enhance the listening experience provided by a home theater receiver. For example, the AVR-X6700H uses Audyssey MultEQ XT32 room calibration technology, which requires the included setup microphone for accurate calibration.

